Set up Identity Cloud for social login
This page explains how to configure your Identity Cloud tenant to work with your social IdP.
Enable IdPs
-
To access the configuration, log in to the Identity Cloud tenant as an administrator.
-
Click Native Consoles.
-
Click Access Management.
-
Click Services.
-
Click Social Identity Providers Service, or create it by clicking Add a Service.
Once in the service, ensure it is enabled.
-
To manage your IdPs, click the Secondary Configurations tab.
Setting up your configuration for providers is mostly the same, but there are a few differences with Apple that are described below.
You will likely need a configuration for each platform that you develop.
Use a naming scheme that’s easy to remember, such as google_web, google_ios, google_android.
Configure Google and Facebook
-
Under Secondary Configuration, click Add a Secondary Configuration, and choose the provider to configure.
The following fields are required:
- Client ID
-
This is the ID for the client registered with the IdP. For native Android, set up the client with the second OAuth set of credentials generated using the web configuration. For details, see Set up social login in Android apps.
- Client Secret
-
This is the secret for the client registered with the IdP.
-
Facebook provides a client secret.
- Android
-
You must set up the secret with the second OAuth set of credentials generated using the Web configuration. For details, see Set up social login in Android apps.
- iOS
-
The Google Credentials do not provide a client secret.
- Redirect URL
-
The redirect URL/URI for your application after the user authenticates with the provider.
- Scope Delimiter
-
" " (a literal space character)
-
For native iOS and Android apps, set Enable Native Nonce to
OFF.The option is
ONby default. -
Click Create.
-
Ensure that the configuration is enabled, and the
Transform Scriptis set toGoogle Profile Normalization, orFacebook Profile Normalization.
Configure Apple
-
Under Secondary Configuration, click Add a Secondary Configuration, and choose the Apple Provider Configuration.
The following fields are required:
- Client ID
-
For native iOS, use the app ID created in the Apple developer page.
For Android or Web, use the service ID.
- Client Secret
-
The JWT client secret you generated.
- Redirect URL
-
- Native iOS
-
Use the
<application-uri>of your app.The
<application-uri>can vary as it does not impact the flow. - Android or Web
-
For AM, use
<forgerock-url>/am/oauth2/client/form_post/<configuration-name>. For example, the configuration name here isapple_web. You can also add the redirect URI from the OAuth2.0 client settings.For IDC, use
<forgerock-url>/am/oauth2/<realmName>/client/form_post/<configuration-name>.
- (Optional) Redirect after form post URL
-
This is only needed for configurations that use the ForgeRock endpoint for handling the POST redirection from Apple. The value of this field is the URL/URI of the Android or web app handling the remainder of the login flow.
- Scope Delimiter
-
" " (a literal space character)
- OAuth Scopes
-
Include the value
emailin this field to include the user’s Apple ID email in the JWT response and the identity token.If you add the email scope after a user agrees to provide scopes, the JWT response and the identity token will not include the user’s Apple ID email.
To troubleshoot when the JWT response does not include the user’s Apple ID email.
-
Sign in with your Apple ID used for authentication at the Apple ID page.
-
Under Security > Sign in with Apple, click Manage apps & websites > Apps & websites using Apple ID.
-
Select the application you are developing using Sign in with Apple.
-
Click Stop using Apple ID.
-
Attempt to re-authenticate in your app.
For more information, read Sign in with Apple - Updated Scope Not Reflected in JWT Claims.
-
- Well Known Endpoint
-
https://appleid.apple.com/.well-known/openid-configuration - Issuer
-
https://appleid.apple.com
-
Click Create to save your configuration.
-
Add these values to complete the configuration:
- Response Mode
-
- Native iOS
-
Use
Default. - Android or Web
-
Use
FORM_POST.
- Transform Script
-
Ensure
Apple Profile Normalizationis selected.
Create your authentication journey
After configuring the provider services, the next step is to build your authentication journey. There are nearly unlimited number of ways to compose authentication journeys. This page covers the basics.
ForgeRock has two different sets of authentication nodes that provide social login capabilities. This page focuses on the node sets supported by all ForgeRock SDKs:
- The Select Identity Provider node
-
The Select Identity Provider node has the following important settings.
- Include local authentication
-
When enabled, this includes an additional "provider" in the
SelectIdPCallbackcalledlocalAuthentication. This also enables a different outcome of the node that you can connect to a local authentication path. The node will now have two outcomes:Social Authentication, andLocal Authentication. - Filter enabled providers
-
This setting further reduces the number of providers passed to your application. This is often used when you have providers configured for different platforms, and you only want the platform specific providers sent to the application.
For more information, see the Select Identity Provider node reference.
- Social Provider Handler node
-
The Social Provider Handler node has the following important settings:
- Transformation Script
-
Set
Normalized Profile to Managed User. - Client Type
-
If the browser is used for IdP authentication (always the case for JavaScript),
BROWSERis the correct value. If you are using the IdP’s SDK with native mobile for authentication, thenNATIVEis the correct choice.
For more information, see the Social Provider Handler node reference.
Create users for a specific realm
To create users from a specific realm, link the Create node and the Patch node to the IDM users and their realm.
For example, for users in the alpha realm, set the Create node and the Patch node as follows:
- Create Object node
-
Set Identity Resource to
managed/alpha_user. - Patch Object node
-
Set Identity Resource to
managed/alpha_user.
For more information, see the Create Object node, and Patch Object node references.
A simple social authentication journey
Start with the simplest journey. A user is presented with a choice of providers, the choice is made, and the user is taken to the IdP to authenticate. Upon the user’s return, ForgeRock user management capabilities read the identity information from the provider to verify, allow, or deny access to the system.
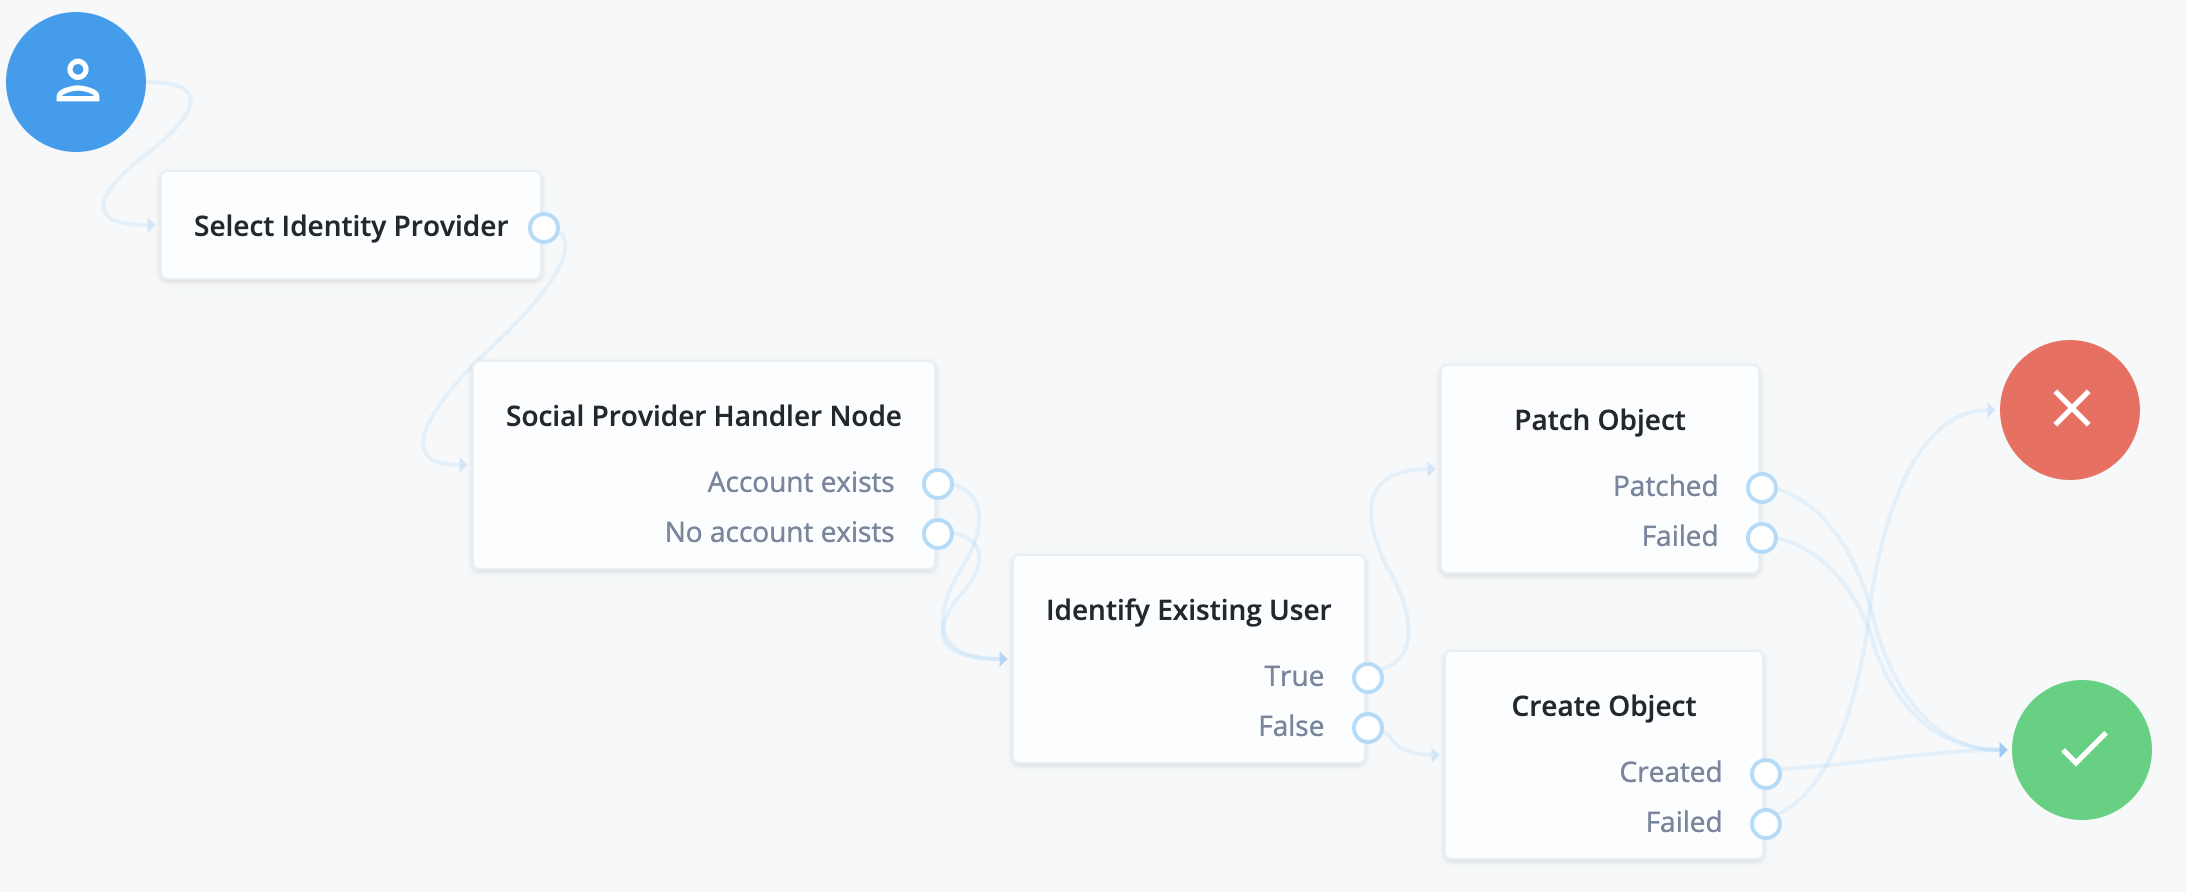
To add a choice of local authentication, enable the feature in the Select Identity Provider node, mentioned above, to create an alternative path for local credentials.
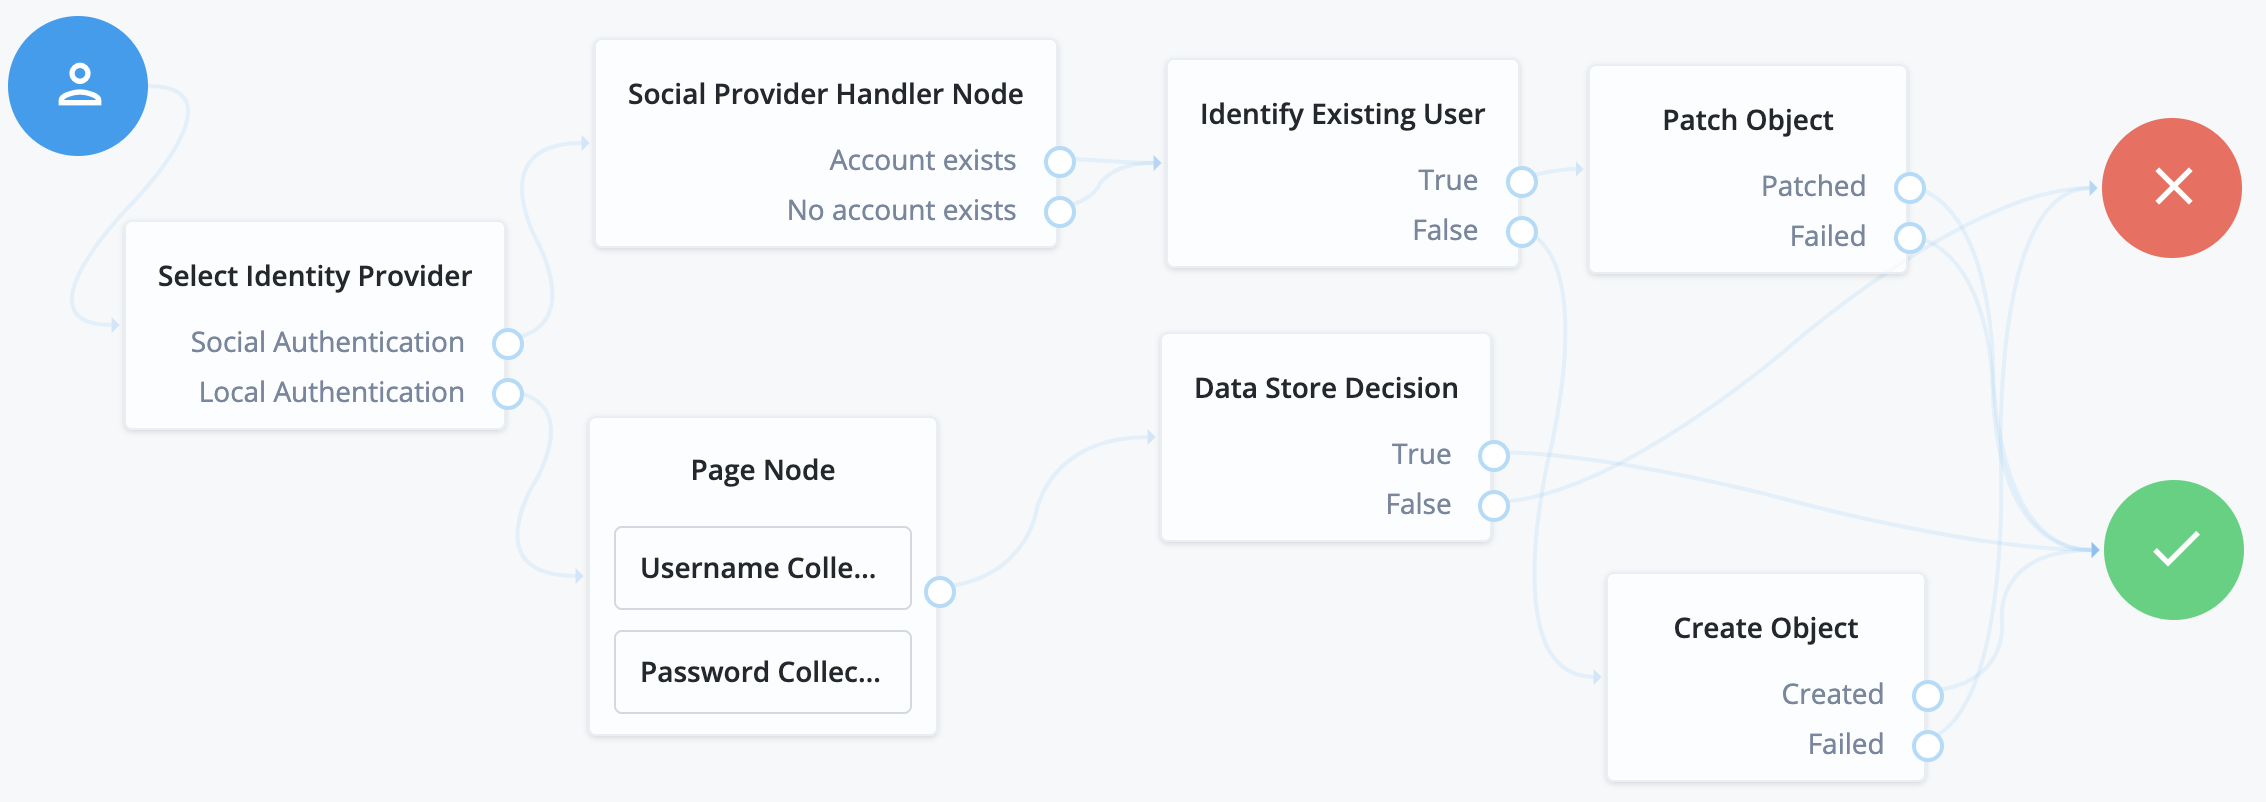
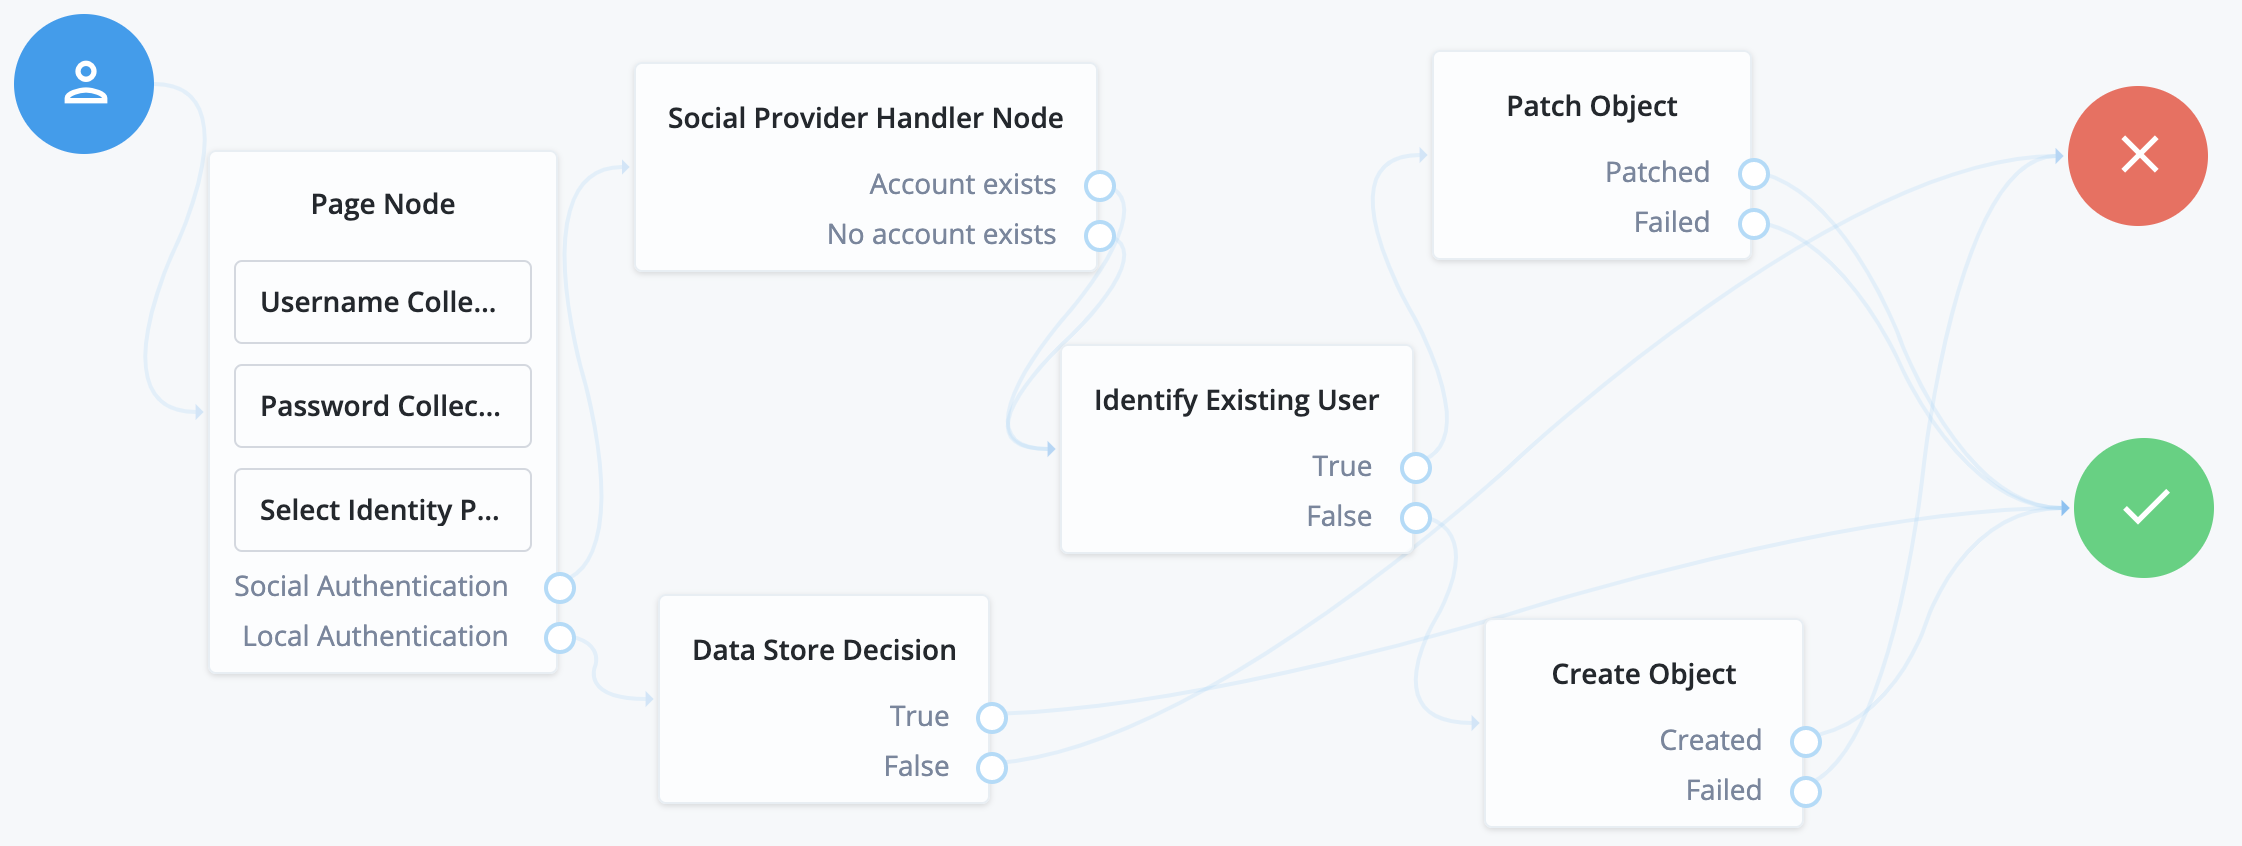
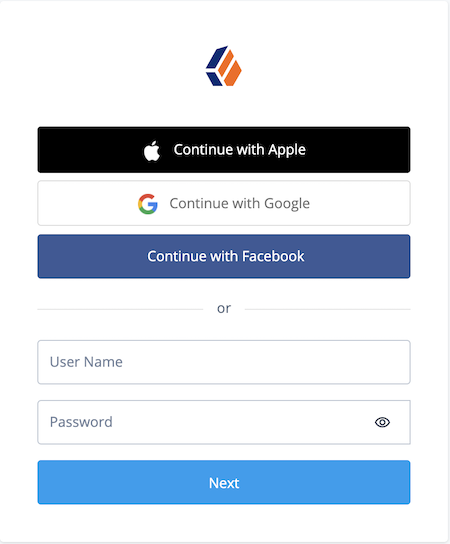
Social authentication and local username-password journey
This is one of the more common authentication journeys seen across the web. This is a choice between using a third-party identity provider, or using first-party credentials with username and password directly. The UI for this combination looks like this:
To compose this type of journey, use a Page node to combine the following nodes:
-
Password Collector/Platform Password
-
Select Identity Provider (enable
Include local authentication)