Step 5: Configure the app for push notifications
In this step, you configure your application projects to use either Firebase Cloud Messaging or the Apple Push Notification service.
Enabling push notification support in an Android app
-
In Android Studio, open your authenticator app project and switch to the Project view.
-
Copy the
google-services.jsonfile that you downloaded from the Firebase console into the app-level root directory of your authenticator app: Figure 1. Adding the
google-services.jsonto the app root in Android Studio. -
To make the file available to the app, add the Google services Gradle plugin (
com.google.gms.google-services) as a dependency to your project.-
In your root-level Gradle file:
-
Kotlin
-
Groovy
build.gradle.ktsplugins { id("io.github.gradle-nexus.publish-plugin") version "1.1.0" id("org.sonatype.gradle.plugins.scan") version "2.4.0" id("org.jetbrains.dokka") version "1.9.10" id("com.android.application") version "8.3.2" apply false id("com.android.library") version "8.3.2" apply false id("org.jetbrains.kotlin.android") version "1.9.22" apply false // ... // Add the dependency for the Google services Gradle plugin id("com.google.gms.google-services") version "4.4.2" apply false }build.gradleplugins { id 'io.github.gradle-nexus.publish-plugin' version '1.1.0' id 'org.sonatype.gradle.plugins.scan' version '2.4.0' id 'org.jetbrains.dokka' version '1.9.10' id 'com.android.application' version '8.3.2' apply false id 'com.android.library' version '8.3.2' apply false id 'org.jetbrains.kotlin.android' version '1.9.22' apply false // ... // Add the dependency for the Google services Gradle plugin id 'com.google.gms.google-services' version '4.4.2' apply false } -
-
In your app-level Gradle file:
-
Kotlin
-
Groovy
build.gradle.ktsplugins { id("com.android.library") id("com.adarshr.test-logger") id("maven-publish") id("signing") id("kotlin-android") // ... // Add the Google services Gradle plugin id("com.google.gms.google-services") }build.gradleplugins { id 'com.android.library' id 'com.adarshr.test-logger' id 'maven-publish' id 'signing' id 'kotlin-android' // ... // Add the Google services Gradle plugin id 'com.google.gms.google-services' } -
-
-
Switch to the Android view in Android Studio, and add the following code to the authenticator application manifest file.
Insert the code inside the
<application>tag.AndroidManifest.xml<service android:name=".controller.FcmService" android:exported="false"> <intent-filter> <action android:name="com.google.firebase.MESSAGING_EVENT" /> </intent-filter> </service>
Enabling push notification support to an iOS app
-
In Xcode, open your authenticator app project.
-
In the left menu, select the project root folder.
-
In the project pane, under Targets, click your application, then click the Signing & Capabilities tab.
-
Confirm that the application has the Push Notifications capability:
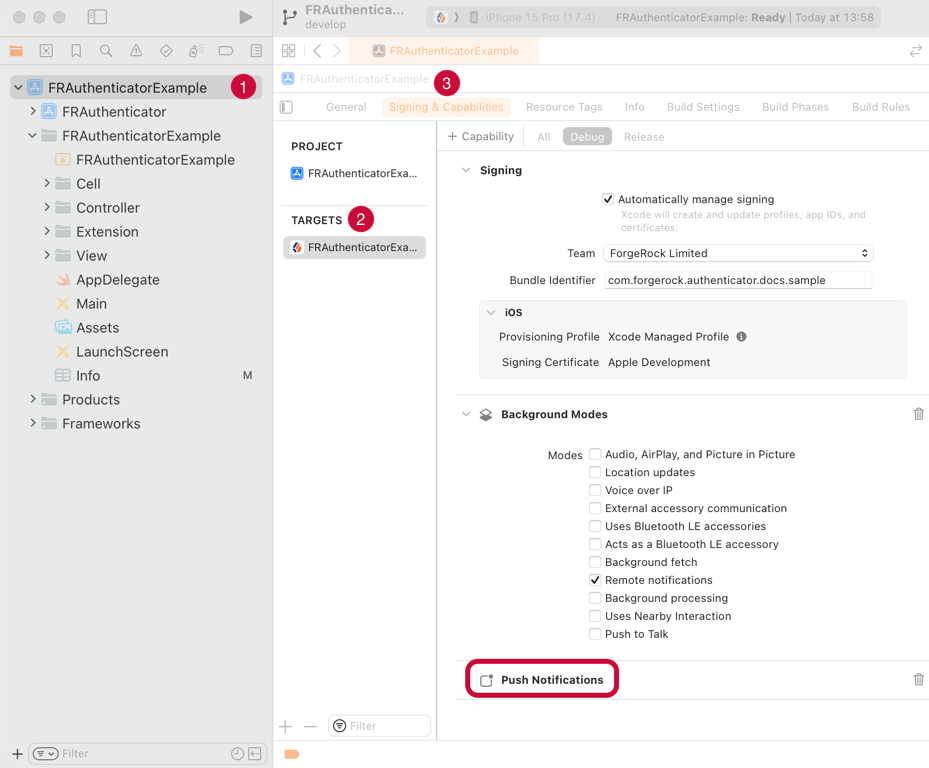 Figure 2. Checking for the Push Notifications capability in Xcode.
 -
With an admin account, log in to the Apple Developer console.
-
Navigate to Program resources > Certificates, IDs & Profiles > Identifiers.
-
Click the name of the application to which you are adding push notification support.
-
On the Capabilities tab, ensure Push Notifications is selected.