Step 4. Configure an PingOne Advanced Identity Cloud or PingAM server for push notifications
In this step, you configure your server to connect to SNS so that it can send out push notifications.
You also create an authentication journey that will register your client application as an MFA device, and send out push notifications.
Add the Authenticator (Push) service
In this step you configure your server to operate with the Ping (ForgeRock) Authenticator module.
-
Advanced Identity Cloud
-
Self-managed PingAM server
-
Log in to the PingOne Advanced Identity Cloud admin UI as an administrator.
-
In the left menu pane, select Native Consoles > Access Management.
The realm overview for the Alpha realm displays.
-
Select Services, and then click Add a Service.
-
In Choose a service type, select ForgeRock Authenticator (Push) Service, and then click Create.
-
Click Save Changes to accept the default settings.
-
Log in to the AM admin UI as an administrator.
The realm overview for the Top Level Realm displays.
-
Select Services, and then click Add a Service.
-
In Choose a service type, select ForgeRock Authenticator (Push) Service, and then click Create.
-
Click Save Changes to accept the default settings.
Connect your server to Amazon SNS
In this step you configure your server with the settings it needs to be able to contact Amazon SNS to send push notifications to mobile devices.
-
Advanced Identity Cloud
-
Self-managed PingAM server
-
Log in to the PingOne Advanced Identity Cloud admin UI as an administrator.
-
In the left menu pane, select Native Consoles > Access Management.
The realm overview for the Alpha realm displays.
-
Select Services, and then click Add a Service.
-
In Choose a service type, select Push Notification Service.
-
In SNS Access Key ID, enter the Access key ID value of the access token you created previously.
For example,
AKIAXOSPRCH15LEES.If you downloaded the CSV file when you created the access key, the first value in the file is the Access Key ID. -
In SNS Access Key Secret, enter the Access key value from the access token you created previously.
For example,
9eF7EcWMZzChI51BBHkLeElXk8R3XHv7/n7QSiwoUFJ.If you downloaded the CSV file when you created the access key, the second value in the CSV file is the Secret access key. -
In SNS Endpoint for APNS, enter the iOS ARN endpoint generated by Amazon SNS.
For example,
arn:aws:sns:eu-west-1:123412341234:app/APNS/iOS_Push_Messaging. -
In SNS Endpoint for GCM, enter the Android ARN endpoint generated by Amazon SNS.
For example,
arn:aws:sns:eu-west-1:123412341234:app/GCM/Android_Push_Messaging. -
Click Create, and then click Save Changes.
-
Log in to the AM admin UI as an administrator.
The realm overview for the Top Level Realm displays.
-
Select Services, and then click Add a Service.
-
In Choose a service type, select Push Notification Service.
-
In SNS Access Key ID, enter the Access key ID value of the access token you created previously.
For example,
AKIAXOSPRCH15LEES.If you downloaded the CSV file when you created the access key, the first value in the file is the Access Key ID. -
In SNS Access Key Secret, enter the Access key value from the access token you created previously.
For example,
9eF7EcWMZzChI51BBHkLeElXk8R3XHv7/n7QSiwoUFJ.If you downloaded the CSV file when you created the access key, the second value in the CSV file is the Secret access key. -
In SNS Endpoint for APNS, enter the iOS ARN endpoint generated by Amazon SNS.
For example,
arn:aws:sns:eu-west-1:123412341234:app/APNS/iOS_Push_Messaging. -
In SNS Endpoint for GCM, enter the Android ARN endpoint generated by Amazon SNS.
For example,
arn:aws:sns:eu-west-1:123412341234:app/GCM/Android_Push_Messaging. -
Click Create, and then click Save Changes.
Create a push registration and authentication journey
In this step you create an authentication journey that registers a device running an app built with the Ping (ForgeRock) Authenticator module to the user’s profile if they have not done so already, then send a push notification to that device.
The journey then polls until it receives a response or timeout from the device. It verifies the returned data and completes the authentication journey if valid.
Choose whether you are creating the journey in PingOne Advanced Identity Cloud or a self-managed PingAM server, and follow the instructions to create the required authentication journey:
-
Advanced Identity Cloud
-
Self-managed PingAM server
-
In the PingOne Advanced Identity Cloud admin UI
-
Select the realm that will contain the authentication journey.
-
Select Journeys, and click New Journey.
-
Enter a name for your tree in Name page; for example,
MFAwithPush -
In Identity Object, select the identity type that will be authenticating, for example
Alpha realm - Users. -
Click Save.
The authentication journey designer page is displayed with the default Start, Failure, and Success nodes.
-
-
Add the following nodes to the designer area:
-
Connect the nodes as shown:
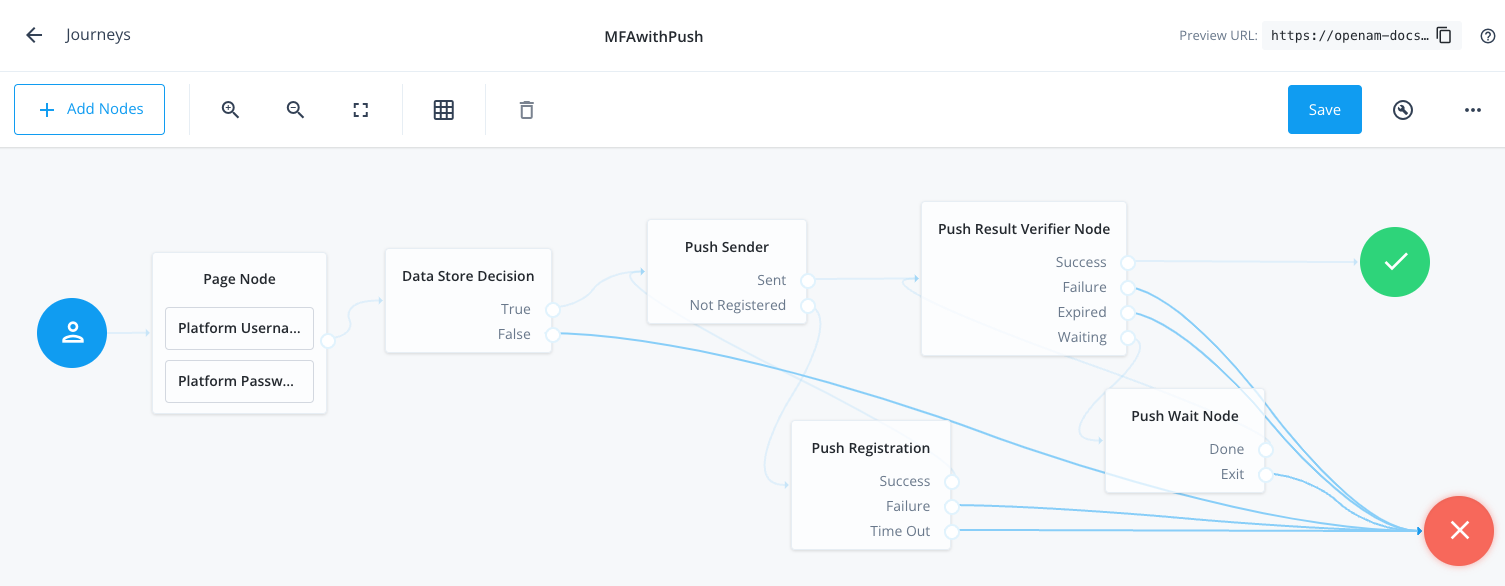 Figure 1. Connect the nodes to identify the user, send a push notification, and very the result.
 -
In the Push Sender node, select the type of push notification the journey sends to the ForgeRock Authenticator:
- Tap to Accept
-
Requires the user to tap to accept.
- Display Challenge Code
-
Requires the user to select one of three numbers displayed on their device. This selected number must match the code displayed in the browser for the request to be verified.
- Use Biometrics to Accept
-
Requires the user’s biometric authentication to process the notification.
For information on how these options appear in the ForgeRock Authenticator, refer to Authenticate using a push notification.
-
Save your changes.
-
In the AM admin UI:
-
Select the realm that will contain the authentication tree.
-
Select Authentication > Trees, and click Create Tree.
-
Enter a name for your tree in the New Tree page; for example,
MFAwithPush, and click Create.The authentication tree designer page is displayed with the default Start, Failure, and Success nodes.
-
-
Add the following nodes to the designer area:
-
Connect the nodes as shown:
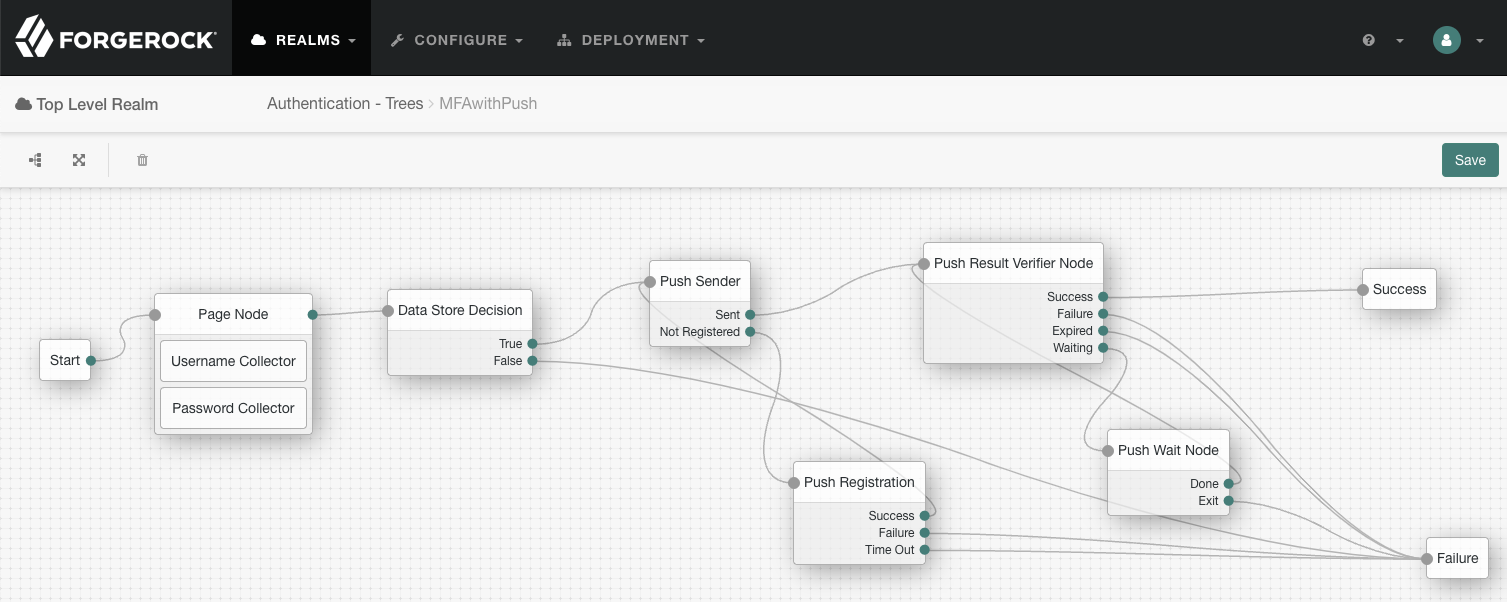 Figure 2. Connect the nodes to identify the user, send a push notification, and very the result.
 -
In the Push Sender node, select the type of push notification the journey sends to the ForgeRock Authenticator:
- Tap to Accept
-
Requires the user to tap to accept.
- Display Challenge Code
-
Requires the user to select one of three numbers displayed on their device. This selected number must match the code displayed in the browser for the request to be verified.
- Use Biometrics to Accept
-
Requires the user’s biometric authentication to process the notification.
For information on how these options appear in the ForgeRock Authenticator, refer to Authenticate using a push notification.
-
Save your changes.
The tree you create is a simple example for the purposes of demonstrating a basic push authentication journey. In a production environment, you could include additional nodes, such as:
- Get Authenticator App node
-
Provides links to download the ForgeRock Authenticator for Android and iOS.
- MFA Registration Options node
-
Provides options for users to register a multi-factor authentication device, get the authenticator app, or skip the registration process.
- Opt-out Multi-Factor Authentication node
-
Sets an attribute in the user’s profile which lets them skip multi-factor authentication.
- Recovery Code Display node
-
Lets a user view recovery codes to use in case they lose or damage the authenticator device they register.
- Recovery Code Collector Decision node
-
Lets a user enter their recovery codes to authenticate in case they have lost or damaged their registered authenticator device.
- Retry Limit Decision node
-
Lets a journey loop a specified number of times, for example, in case the user’s device is experiencing connectivity issues, for example.