Workflow using custom request type and form
In this example, an administrator wants to create a custom request type called Create New User to add new employees or contractors
to the system. Administrators or form creators need to carry out the following tasks:
After these tasks, the approver receives the request and can start processing the approval.
Assumptions
-
Each application has an application owner. You populate this value for each target application.
-
You have designated an end user or a test user who can approve the request.
-
You have configured notifications to the end user or test user properly to receive the emails.
Task 1: Create a custom request type
The initial task is to create a custom request type, Create New User that lets an administrator easily add a new user to the system.
The 'Create New User' request type has the following nonmodifiable properties:
-
userName. Username of the new user.
-
givenName. First name of the new user.
-
sn. Last name of the new user.
-
mail. Email address of the new user.
|
Currently, the only way to create a custom request type is through the API. The UI will support this functionality in a future release. |
-
Create a custom request type called
createUserusing the API. Enter the following command using curl to create your custom request type:Details
curl --location 'http://<hostname>/iga/governance/requestTypes' \
--header 'Authorization: Bearer token' \
--header 'Content-Type: application/json' \
--data '{
    "id": "createNewUser",
    "schemas": {
        "custom": [
            {
                "_meta": {
                    "type": "system",
                    "displayName": "Create User",
                    "properties": {
                        "userName": {
                            "isRequired": true,
                            "isInternal": false,
                            "isMultiValue": false,
                            "display": {
                                "name": "User Name",
                                "isVisible": true,
                                "order": 1,
                                "description": "The userName of the new user"
                            }
                        },
                        "givenName": {
                            "isRequired": true,
                            "isInternal": false,
                            "isMultiValue": false,
                            "display": {
                                "name": "First Name",
                                "isVisible": true,
                                "order": 2,
                                "description": "The first name of the new user"
                            }
                        },
                        "sn": {
                            "isRequired": true,
                            "isInternal": false,
                            "isMultiValue": false,
                            "display": {
                                "name": "Last Name",
                                "isVisible": true,
                                "order": 3,
                                "description": "The last name of the new user"
                            }
                        },
                        "mail": {
                            "isRequired": true,
                            "isInternal": false,
                            "isMultiValue": false,
                            "display": {
                                "name": "Email Address",
                                "isVisible": true,
                                "order": 4,
                                "description": "The email address of the new user"
                            }
                        }
                    }
                },
                "properties": {
                    "userName": {
                        "type": "text"
                    },
                    "givenName": {
                        "type": "text"
                    },
                    "sn": {
                        "type": "text"
                    },
                    "mail": {
                        "type": "text"
                    }
                }
            }
        ]
    },
    "workflow": {
        "id": "createNewUser",
        "type": "bpmn"
    },
    "validation": {
        "source": "var validation = {\"errors\" : [], \"comments\" : []}; if (request.custom.userName == undefined || request.custom.givenName == undefined || request.custom.sn == undefined ||  request.custom.mail == undefined) { validation.errors.push(\"Must include all of userName, givenName, sn, and mail fields.\");} validation;"
    },
    "custom": true,
    "displayName": "Create User",
    "uniqueKeys": [
        "custom.userName"
    ],
    "notModifiableProperties": []
}'
Task 2: Create a form for the custom request type
Using the UI
-
In the Advanced Identity Cloud admin UI, click Governance > Forms.
-
On the New Form modal, click Custom request form, and then click Next.
-
On the Custom request form modal, enter the following:
Field Description Form
Enter a descriptive name for your form.
Description (optional)
Enter a general description for your form.
Request Type (optional)
Select a custom request type from the list. In this example, select Create User.
You can only assign one form to each request type. Once you create your form, you can go back and make edits to any of the previous form settings by clicking the ellipsis() in the top right, and then click Settings.
-
Use the Forms editor to create a form for your custom request type. For example, drag-and-drop four text fields onto the canvas for the fields and label them:
User Name,E-mail address,First Name, andLast Name.-
On the Forms editor canvas, drag-and-drop the Text node to the canvas, and fill in the properties in the right pane for the
User Namefield:User name text field properties
Field Description Key
Enter the key for the text string. You can retrieve this key from the curl step under the
schemasentry. For example, entercustom.userNameas the key.Label
Enter a general label for this text field. For example, enter
User Name.Description
Enter help text for the text field. The description appears below your text field.
Required
Click if this text field is required. In this example, click Required.
Read Only
Click to make the field non-editable.
Provide Default Value
Click Provide Default Value to assign a default value for this text field. In this example, skip this step.
Columns
Enter the number of columns for this text field. Values are from 1 to 12. For this example, enter
6.Offset
Enter the number of columns to offset from the left for this text field. Values are from 0 to 11. For this example, enter
0.Use validation
Click if you want to validate the text field using a regular expression. In this example, skip this step.
Regex
Enter a regular expression to validate the text field.
Error message
Enter an error message when the regular expression fails.
-
On the Forms editor canvas, drag-and-drop the Text node to the canvas, and fill in the properties in the right pane for the
E-mail addressfield:E-mail address text field properties
Field Description Key
Enter the key for the text string. You can retrieve this key from the curl step under the
schemasentry. For example, entercustom.mailas the key.Label
Enter a general label for this text field. For example, enter
E-mail address.Description
Enter help text for the text field. The description appears below your text field.
Required
Click if this text field is required. In this example, click Required.
Read Only
Click to make the field non-editable.
Provide Default Value
Click Provide Default Value to assign a default value for this text field. In this example, skip this step.
Columns
Enter the number of columns for this text field. Values are from 1 to 12. For this example, enter
6.Offset
Enter the number of columns to offset from the left for this text field. Values are from 0 to 11. For this example, enter
0.Use Validation
Click if you want to validate the text field using a regular expression. In this example, skip this step.
Regex
Enter a regular expression to validate the text field.
Error message
Enter an error message when the regular expression fails.
-
On the Forms editor canvas, drag-and-drop the Text node to the canvas, and fill in the properties in the right pane for the
First Namefield:First name text field properties
Field Description Key
Enter the key for the text string. You can retrieve this key from the curl step under the
schemasentry. For example, entercustom.givenNameas the key.Label
Enter a general label for this text field. For example, enter
First Name.Description
Enter help text for the text field. The description appears below your text field.
Required
Click if this text field is required. In this example, click Required.
Read Only
Click to make the field non-editable.
Provide Default Value
Click Provide Default Value to assign a default value for this text field. In this example, skip this step.
Columns
Enter the number of columns for this text field. Values are from 1 to 12. For this example, enter
6.Offset
Enter the number of columns to offset from the left for this text field. Values are from 0 to 11. For this example, enter
0.Use validation
Click if you want to validate the text field using a regular expression. In this example, skip this step.
Regex
Enter a regular expression to validate the text field.
Error message
Enter an error message when the regular expression fails.
-
On the Forms editor canvas, drag-and-drop the Text node to the canvas, and fill in the properties in the right pane for the
Last Namefield:Last name text field properties
Field Description Key
Enter the key for the text string. You can retrieve this key from the curl step under the
schemasentry. For example, entercustom.snas the key.Label
Enter a general label for this text field. For example, enter
Last Name.Description
Enter help text for the text field. The description appears below your text field.
Required
Click if this text field is required. In this example, click Required.
Read Only
Click to make the field non-editable.
Provide Default Value
Click Provide Default Value to assign a default value for this text field. In this example, skip this step.
Columns
Enter the number of columns for this text field. Values are from 1 to 12. For this example, enter
6.Offset
Enter the number of columns to offset from the left for this text field. Values are from 0 to 11. For this example, enter
0.Use validation
Click if you want to validate the text field using a regular expression. In this example, skip this step.
Regex
Enter a regular expression to validate the text field.
Error message
Enter an error message when the regular expression fails.
-
-
Click Save.

Using the API
-
Enter the following curl command to create your form for the custom request type:
Details
curl --location 'http://<hostname>/iga/governance/requestForms' \ --header 'Authorization: Bearer token' \ --header 'Content-Type: application/json' \ --data '{ "name": "Create New User", "type": "request", "description": "Form for creation of a new user", "categories": { "applicationType": null, "objectType": null, "operation": "create" }, "form": { "fields": [ { "id": "dd155b12-fb27-44e5-b4d6-476587b31a71", "model": "custom.userName", "type": "string", "label": "User Name", "description": "User name of the new user", "validation": { "required": true }, "layout": { "columns": 6, "offset": 0 } }, { "id": "88c73e69-86b1-453f-878b-527ceddeccf4", "model": "custom.mail", "type": "string", "label": "E-mail address", "description": "E-mail address of the new user", "validation": { "required": true }, "layout": { "columns": 6, "offset": 0 } }, { "id": "683892f9-2c13-41c7-a1cc-fcf38d7d0183", "model": "custom.givenName", "type": "string", "label": "First Name", "description": "First name of the new user", "validation": { "required": true }, "layout": { "columns": 6, "offset": 0 } }, { "id": "76fd5526-2ade-42a9-9b03-b6899e65aa31", "model": "custom.sn", "type": "string", "label": "Last Name", "description": "Last name of the new user", "validation": { "required": true }, "layout": { "columns": 6, "offset": 0 } } ] } }' -
Enter the following curl command to assign the form to the custom request type.
Details
curl --location 'http://<hostname>/iga/governance/requestFormAssignments?_action=assign' \
--header 'Authorization: Bearer token' \
--header 'Content-Type: application/json' \
--data '{
    "formId": "b309b500-112c-4e6d-b832-a902f91362a3",
    "objectId": "requestType/createNewUser"
}'
Task 3: Create a workflow to use the custom request type and form
Create a new workflow called Create New User to use the custom request type and form.

-
1 Use a Script node to do a context check for the request.
Click to display the Request Context Check script
var content = execution.getVariables(); var requestId = content.get('id'); var context = null; var skipApproval = false; try { var requestObj = openidm.action('iga/governance/requests/' + requestId, 'GET', {}, {}); if (requestObj.request.common.context) { context = requestObj.request.common.context.type; if (context == 'admin') { skipApproval = true; } } } catch (e) { logger.info("Request Context Check failed "+e.message); } logger.info("Context: " + context); execution.setVariable("context", context); execution.setVariable("skipApproval", skipApproval); -
2 Use an IF/ELSE node and name it
Context Gateway. IfskipApproval==true, route it to theAuto Approvalnode. IfskipApproval==false, route it to theApproval Tasknode. -
3 Use a Script node for the
Auto Approvaltask.Click to display the Auto Approval script
var content = execution.getVariables(); var requestId = content.get('id'); var context = content.get('context'); var queryParams = { "_action": "update" } try { var decision = { "decision": "approved", "comment": "Request auto-approved due to request context: " + context } openidm.action('iga/governance/requests/' + requestId, 'POST', decision, queryParams); } catch (e) { var failureReason = "Failure updating decision on request. Error message: " + e.message; var update = {'comment': failureReason, 'failure': true}; openidm.action('iga/governance/requests/' + requestId, 'POST', update, queryParams); } -
4 Use a Script node to create a new user using the custom request type.
Click to display the Create User script
logger.info("Creating User"); var content = execution.getVariables(); var requestId = content.get('id'); var failureReason = null; try { var requestObj = openidm.action('iga/governance/requests/' + requestId, 'GET', {}, {}); logger.info("requestObj: " + requestObj); } catch (e) { failureReason = "Provisioning failed: Error reading request with id " + requestId; } if(!failureReason) { try { var request = requestObj.request; var payload = { "userName": request.custom.userName, "givenName": request.custom.givenName, "sn": request.custom.sn, "mail": request.custom.mail, "password": 'DemoP@ssword1' }; /** Create new user **/ var result = openidm.create('managed/alpha_user', null, payload, queryParams); /** Send new user email **/ var body = { subject: "Welcome " + payload.givenName + " " + payload.sn + "!", to: payload.mail, body: "Your new user has been created in the system.\n\nUsername: " + payload.userName + "\nPassword: " + payload.password + "\n\nLogin to your account here: https://openam-gov-dev-4.forgeblocks.com/am/XUI/?realm=/alpha#/", object: {} }; openidm.action("external/email", "send", body); } catch (e) { failureReason = "Creating user failed: Error during creation of user " + request.custom.userName + ". Error message: " + e.message; } var decision = {'status': 'complete', 'decision': 'approved'}; if (failureReason) { decision.outcome = 'not provisioned'; decision.comment = failureReason; decision.failure = true; } else { decision.outcome = 'provisioned'; } var queryParams = { '_action': 'update'}; openidm.action('iga/governance/requests/' + requestId, 'POST', decision, queryParams); logger.info("Request " + requestId + " completed."); } -
5 The Approval node assigns an approval task to users and roles. The node chains tasks in conjunction with a Switch node to implement serial or parallel flows.
Click to display the Approval Task properties
Item Description Name
Approval TaskApprovers
Two options are available:
-
Add users and roles manually, such as
Role Owner, and define theApprovertype. For this example, click . In the Approver Type field, select User, and then select a user. Give the approvers all permissions below. Click Add.-
Approve
-
Reject
-
Reassign
-
Modify
-
Comment
-
-
Define users using a script:
Form
Select a form to present to the reviewer.
-
Dynamic form selection. Skip this step
-
Click Choose a form and select
Create New User.
Expiration Settings
Options are:
-
Reject request. For this example, you can select this option.
-
Reassign request
-
Do nothing
Notification Settings
Options are:
-
Assignment notification and email templates, such as
requestAssigned. -
Reassignment notification and email templates, such as
requestReassigned. -
Assignee reminders and email templates, such as
requestReminder.-
Sends every number of time periods, such as
3 day(s).
-
-
Escalation notifications and email templates, such as
requestEscalated.-
Send every number of day(s), such as
5 day(s). -
Send to
Send escalation totoUserand selectUser.
-
-
Expiration notification and email templates, such as
requestExpired.-
Send a configured number of days before expiration.
-
-
-
6 Use the Script node to process any request rejections.
Click to display the Reject Request script
logger.info("Rejecting request");

var content = execution.getVariables();
var requestId = content.get('id');

logger.info("Execution Content: " + content);
var requestIndex = openidm.action('iga/governance/requests/' + requestId, 'GET', {}, {});
var decision = {'outcome': 'denied', 'status': 'complete', 'decision': 'rejected'};
var queryParams = { '_action': 'update'};
openidm.action('iga/governance/requests/' + requestId, 'POST', decision, queryParams);
|
Download the JSON file for this workflow here. Learn more about how to import or export workflows in workflow editor canvas. |
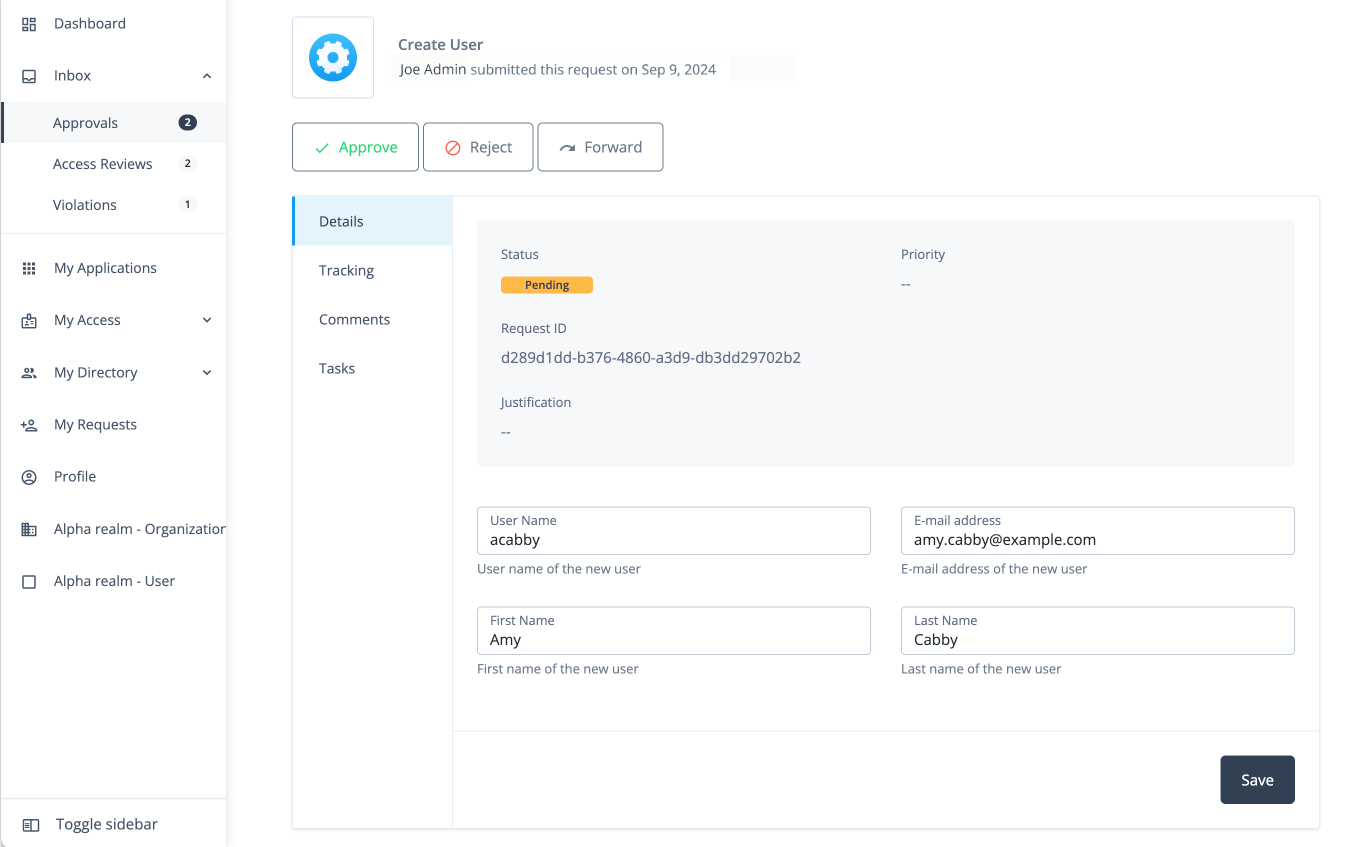
Task 4: Submit the custom request
You can enter a curl command to submit a Create New User request.
curl --location 'https://<hostname>/iga/governance/requests/createNewUser' \
--header 'Authorization: Bearer token' \
--header 'Content-Type: application/json' \
--data-raw '{
    "custom": {
        "userName": "acabby",
        "givenName": "Amy",
        "sn": "Cabby",
        "mail": "amy.cabby@example.com"
    }
}'
Example Response
{
  "id": "d289d1dd-b376-4860-a3d9-db3dd29702b2",
  "requester": {
    "givenName": "Joe",
    "id": "managed/teammember/ce6ef368-c050-4131-bc07-32aa4f58a785",
    "mail": "joe.admin@example.com",
    "sn": "Admin",
    "userName": "jadmin"
  },
  "requestType": "createNewUser",
  "request": {
    "custom": {
      "userName": "acabby",
      "givenName": "Amy",
      "sn": "Cabby",
      "mail": "amy.cabby@example.com"
    },
    "_rev": 1,
    "common": {
      "isDraft": false,
      "context": {
        "type": "request"
      }
    }
  },
  "decision": {
    "status": "in-progress",
    "decision": null,
    "type": "request",
    "outcome": null,
    "startDate": "2024-09-09T15:53:49+00:00",
    "completionDate": null,
    "deadline": null,
    "comments": [],
    "actors": {
      "active": [
        {
          "givenName": "Frank",
          "id": "managed/teammember/ce6ef368-c050-4131-bc07-32aa4f58a785",
          "mail": "frank.york@exampe.com",
          "sn": "York",
          "userName": "fyork",
          "permissions": {
            "approve": false,
            "comment": true,
            "modify": false,
            "reassign": false,
            "reject": false,
            "cancel": false,
            "fulfill": false,
            "deny": false
          }
        }
      ],
      "inactive": [],
      "actorTags": [
        "activeId=managed%2Fteammember%2Fce6ef368-c050-4131-bc07-32aa4f58a785&phase=",
        "phase=&activeId=managed%2Fteammember%2Fce6ef368-c050-4131-bc07-32aa4f58a785"
      ]
    }
  }
}
Approver Task: Process the request
-
Once the administrator submits the request, the approver (for example, "Frank York") receives a notification email.
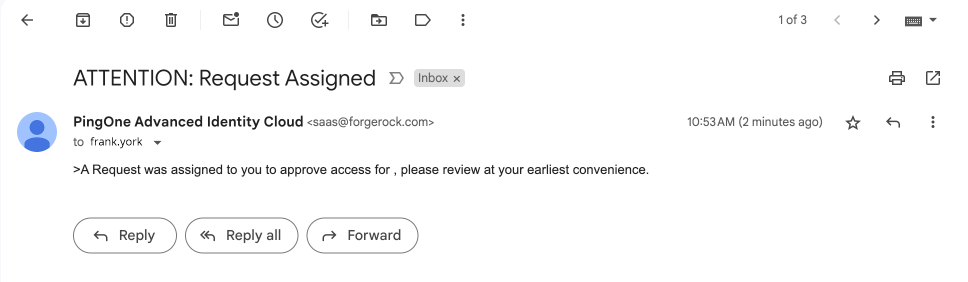
-
The approver logs in to the Advanced Identity Cloud end-user UI and clicks Pending Approvals.

-
The approver can carry out different tasks: click Approve, Reject, or ellipsis () to Forward, Add Comment, or View Details.
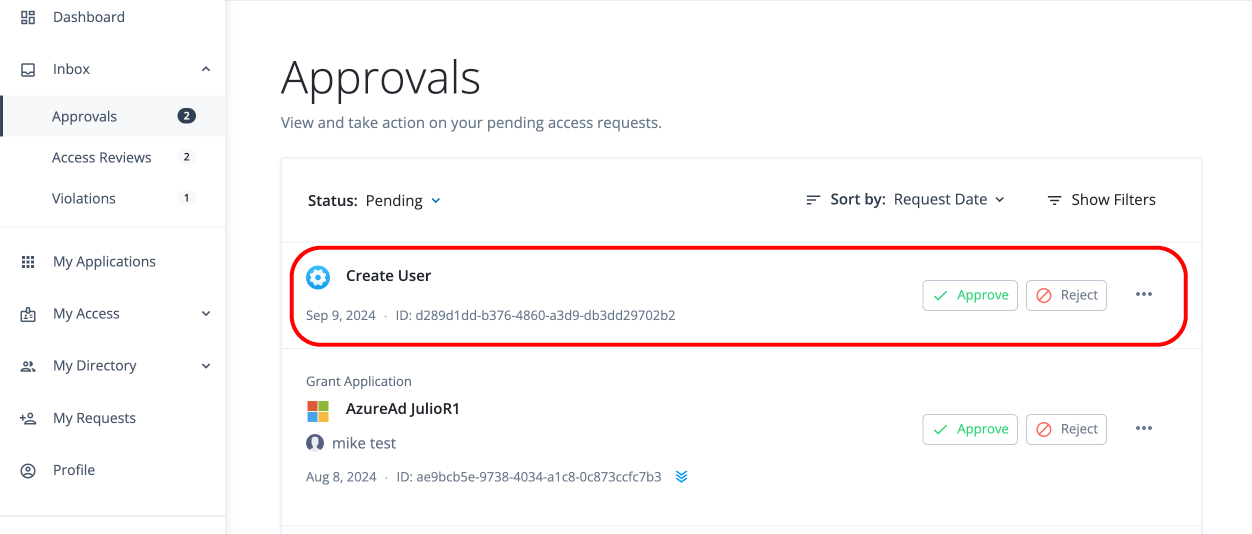
-
The approver clicks View Details.